Friday, July 17, 2015

Lab 14: Titration (Final Lab)

 (Photo of the analyte at what was meant to be the equivalence point, but we put in too much NaOH)

(Photo of the setup/materials of the lab)

The procedure of this lab was to fill up the burette with NaOH, and then drop the NaOH slowly into a flask that had a magnetic stir bar inside of it (we activated it by using the hot plate's stir function, it was cool), as well as 6-8mL of vinegar with 3-5 drops of phenolphthalein dispersed in it. The reason why we did this was to see if we could reach the equivalence point. If we couldn't, we'd have to do the procedure over again. We never got the exact molarity, which was 0.83M, from the lab in any of our three trials, but the last one was the closest, at a solid 0.85M. The percent ionization was found by dividing our average H3O+ concentration, which was 0.81M, by the average concentration for NaOH, which was 0.04M. This resulted in a .49% ionization, and the reson this number is so low is because acetic acid is a weak acid, so they don't ionize because they don't disassociate well.

Wednesday, July 15, 2015

Lab 13B: Solubility


Introduction: The purpose of this lab was to find an unknown substance (given three options-NaCl, KCl, and NaNO3) by creating a method - involving solubility, which is a term for how soluble a solute (the substance you're trying to dissolve) is in a solvent (the substance in which you try and dissolve a solute) - to do so. How we'd know which solute was the one we were given was provided to us (indirectly) on a graph, which charted the solubility for each of the three solutes given. So, as a result, the core of this lab was to find a substance by making a procedure, when only given a few materials and our own minds.

Materials: 2 beakers of different sizes, a plastic tray, the substance, a graduated cylinder, about 10mL of water, a stirring rod (to be used to stir and break up the solid), a thermometer, and a hot plate.

Procedure: First, we filled up the smaller of the two beakers with water, and found its temperature. Then, we obtained a plastic tray and found the mass of it, then poured the solid in and found the mass of the solid and the tray combined, then subtracted the combined mass by the mass of the tray alone to find the mass of the substance. We pour the substance into the room-temperature beaker (the other beaker is currently sitting on the hot plate heating up some water so we can heat the other beaker indirectly by putting the small beaker into the big beaker), and try and dissolve it for 2 minutes. As the substance is put into a temperature where, on the graph, two solutes have similar solubility points, and one's solubility point given that temperature is very far away from the others. If the solute dissolves, it's the one that's far away, but if it doesn't, it's one of the two that are very close to each other given the temperature. Unfortunately, it doesn't dissolve completely, and we have to use the heated beaker. We place the small beaker inside the big beaker, and heat up the water to the point where the two previously-close substances (in terms of solubility) now have far-apart solubility rates given a certain temperature. If the substance dissolves, it's Potassium Nitrate, but if it doesn't, it's Sodium Chloride (which makes the previously-eliminated substance Sodium Nitrate). Luckily, it dissolves, so the substance is found to be Potassium Nitrate.

Data:

Temperatures of water:
- 20.5 degrees Celsius (small beaker at room temperature).
- 45.6 degrees Celsius (small beaker inside the larger beaker).

Masses:
- 2.04g (tray)
- 7.44g (tray + solid)
- 5.40g (solid).

Volume of Water: 10mL.

Conclusion: The solid is Potassium Nitrate, as a) it didn't dissolve at 20.5 degrees Celsius (which it would've if it was Sodium Nitrate), and b) it did dissolve at 45.6 degrees Celsius (which it wouldn't have if it was Sodium Chloride). This also shows the relationship between temperature and solubility, which is that if one increases, the other will increase as well.

Lab 12: Gases

Set-Ups:

Case 1: For this case, my group and I set up the constant to be the Temperature. Then, we set different volumes for the container in which the particles were held, and then from there, we recorded the volumes of the container as well as the corresponding pressures, which led to the realization that Volumes and Pressures have an inverse relationship.

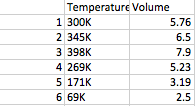
Case 2: The constant was the Pressure. So, with that pressure, my group and I raised and lowered the temperature in Kelvins, and then we noted how the Temperature and Volume had a direct relationship.

Case 3: The constant, in this case, was the volume. So, for a given volume, we moved the temperature up and down and saw how the pressure reacted when the temperature was being moved, and found that it was a direct relationship as well.

Case 4: In this instance, we had two constant variables: the temperature and the pressure. With this one, we adjusted the amount of particles that were in the space, but since the volume wasn't fixed, it moved itself to adjust for the particles in the space. This relationship, like the last two, is direct.

Questions:

3. See below

4a. Bicycle tires seem flatter because the temperature decreases from the summer to the winter, and as the temperature decreases, the volume will decrease. This is a case of Charles's Law.

4b. In the summer, if a soda can is left out, the temperature around the can increases, which in turn makes the pressure increase, according to Gay-Lussac's Law.

4c. As the temperature of the gas decreases, as a temperature of an object does when the object is placed in ice, it'll decrease the pressure (according to Gay-Lussac's law), but the volume will stay the same as the container is "rigid," and being placed on ice will not change the natural size of the container.

4d. This treatment will not help because as the temperature increases by means of treating the area with moist heat, the pressure will also increase, and since pressure last time caused a toothache, there's no reason to think that increasing pressure (by means of moist heat) this time will alleviate the pressure unlike last time.

Data:

(Case 1 data)
 (Case 2 data)

(Case 3 data)


Case 4 data


Tuesday, July 14, 2015

Lab 11B: Calories of food

This lab was made to see if we could find Calories (not calories, as calories with a lower-case c aren't what we're looking for, but rather Calories, which are made up of 1000 calories) of food by burning the food, and then using that data to find the Calories per gram of food.

Questions:

1. We measured the temperature change in the water.

2. Since the energy released by the food was then mostly gained by the water, we could say that by measuring the energy gained by the water, we measured the energy released by the food.

3. The can that we had had some small holes in it, so if some energy released by the food wasn't absorbed by the water, it most likely escaped the can.

4. I was surprised that the cheese curl burned so much, especially given the fact that I was told that the cheese curl might not give especially good results.


Lab 11A: Specific Heat of a Metal

For this lab, we just had to find the identity of an unknown block of metal. How we did that was we first found the temperature of this block of metal at a boiling temperature, then we found it at room temperature, thus giving us the power to find the specific heat of the metal, which then lead to the identity of the metal.

Mass of styrofoam cup: 7.87g
Mass of cup + water: 128.22g
Mass of water 120.35g
Initial temperature of water in cup: 20.9 C
Initial Temperature of metal in boiling water: 100.0 C
Final temperature of metal and water: 29.0 C
Mass of metal alone: 89.04g

Heat gained by water: 120.35g*4.184J/gC*8.1C=4079J
Specific Heat of Metal: -4079J/(89.04g)*(20.9C-100.0C)=0.58J/gC

Based off this, the closest metal would be steel. The reason for error would be that perhaps the thermometer was slightly off, or just a few incorrect measurements (i.e. being of by a few tenths of a gram on measurement).

Monday, July 13, 2015

Lab 10: Evaporations and Intermolecular Attractions

(Picture of the Pre-lab table)

(Picture of the data from the lab)

2. The reasons why there are differences in the amount of temperature lost in these five substances are intermolecular forces and molar mass. Intermolecular forces are the main reason why, however. Since there is an understanding that the stronger the IMF (Intermolecular force), the weaker the vapor pressure, whichever substance has the weakest IMF's will evaporate at a greater rate than the others. However, you may be thinking, "There are multiple substances that have the same number of hydrogen bonds, but they don't evaporate at the same rate. Why is that?" That is because of molar mass. Whenever any two substances have the same amount of bonds, it will come to the molar mass to decide which molecule will evaporate quicker (the one with the least molar mass).

3. Two substances with similar molar masses are methanol and ethanol. The reason that they evaporate at different rates is because of molar mass, since they both only have one hydrogen bond apiece. So, since ethanol is larger than methanol, it will evaporate at a slower pace than methanol.

4. Since all of the substances have -OH bonds, the focus will turn to the number of -OH bonds they have. Methanol and ethanol each only have one -OH bond, and looking at the chart, they evaporated the quickest out of the five. Next came n-Butanol and Water, which each had 2 -OH bonds, meaning that the intermolecular forces on those two substances were stronger than those of methanol and ethanol, and as a result, the evaporated at a slower pace. Finally, there's glycerin, which had 3 -OH bonds, making it the strongest of the five substances, and that shows, as the substance didn't evaporate at all.

Thursday, July 9, 2015

Lab 7: Flame Test

The purpose of this lab was to see how different chemicals reacted (i.e. what colors they produced) when put to a flame, as well as seeing if we could identify 2 unknown chemical compounds when they were put to a flame.

(the answers to the pre-lab questions)

(one of the flames produced in the lab)

The identities of the 2 unknowns were Lithium Chloride (unknown #1) and Potassium Chloride (unknown #2). I know this because when testing these two unknowns, each one emitted flames that were very close in color to those two compounds.

Tuesday, July 7, 2015

Lab 8: Electron Configuration Battleship

(the set up of the game of battleship)

The biggest challenge I had while playing this game was correctly guessing where my opponent's "ships" were located (since electron configuration came easily to me, that wasn't an issue). One thing I learned while playing was that a lot of the names of elements are tricky to say, making the confirmation that you give to your partner that they hit the element they wanted to hit a bit difficult.

Monday, July 6, 2015

Lab 6: Mole-Mass Relationships

The purpose of this lab was to apply our skills that we had learned about mole-mass relationships earlier in the day, specifically the formulas that came along with it (i.e. turning the mass to moles and vice-versa), in a situation where using them worked to our benefit.

1. NaHCO3 was the limiting factor because you had a range of mL that you could use for the acid (the max was 15 mL), but you couldn't abandon the fixed mass of NaHCO3 that you had.

(Questions #2-#4)

Looking at number 4, the percent yield is 143%. Obviously, there is some error here, as the percent yield shouldn't ever pass 100%. The reason for this error would probably be the equipment that we used to contain the acid + NaHCO3. Since the acid ate through the evaporating dish that we were going to use, we had to use a beaker. And since the beaker is less open than an evaporating dish, not all of the water was able to get out. So, as a result, the percent yield includes the solid and some lingering water particles, and not just the solid.

Sunday, July 5, 2015

Lab 5B: Composition of a Copper Sulfate Hydrate


(The hydrate before heating)                                       (The hydrate after heating)

1.Mass of hydrate used: Mass of hydrate and the Evaporating Dish-Mass of the Evaporating Dish=Mass of Hydrate.

2.13-1.21 = 0.92 g

2. Mass of water lost: (Mass of Hydrate + Dish) - (Mass of Dish + Anhydrous salt (final variable in this step).

2.13-1.96= 0.17 g

3. Percentage of Water in hydrate: 0.17/0.92 = 18.5%

4. Percent error. An acceptable percentage of water in the hydrate was 36.0%

| 18.5 - 36.0 | /36.0= 48.7% error.

Some possible reasons for the high discrepancy are as follows:

-We completed the lab to the specifications given in 2 attempts, so it's possible there was still some water remaining

-The scale on which we weighed the evaporating dish and the salt was fluctuating greatly (the average seemed to be 1.96 g for the second measurement, so we went with that), so it's possible that the salt had, in fact, lost more than .05g (we were supposed to stop once the fluctuations between measurements had gone under .05g, which we did).

5.

Moles of water evaporated: 0.17/x=18.01/1, 18.01x=0.17, x=9.44 * 10^-3 (18.01 is the molar mass of all of the components in water).

Moles of CuSO4 remaining: 0.75/x=159.607/1, 0.75 = 159.607x, x=4.70 * 10^3 (159.607 is in this equation as was 18.01 was in the equation directly above this one).

Ratio of Moles: H2O: 9.44 * 10^-3/4.70 * 10^-3 = 2, CuSO4: 4.70 * 10^-3/4.70 *10^-3 = 1.
The ratio of moles is 2:1

Empirical Formula: CuSO4 * 2H2O

Going back to the percent error, I have a feeling that because the error is so high, and my coefficient is relatively low, that the coefficient I gave is lower than the actual coefficient.

Lab 5A: Mole Baggie

The purpose of this lab was to firm up our knowledge of moles and the formulas accompanying them, as well as using the resource of the periodic table to back up initial thoughts. For example, for Set A, we were given a bag with the mass of said bag and the number of moles in the bag. From there, we weighed the bag with the contents inside of it, then subtracted the mass of the bag from that number. Then, we divided the mass of the solid by the number of moles, and got the molar mass of that bag. After that, we got the molar masses for all of the five possible compounds (sodium chloride, potassium sulfate, zinc oxide, sodium sulfate, and calcium carbonate), and paired the molar mass of the contents of the bag with the compound closest to that measurement. So, for bag A1, it was filled with Sodium Chloride.

Set B was a little different. We were still given the mass of the empty bag, but instead of the number of moles, we were given the number of particles. We still started off the same way, with finding the mass of the bag with contents inside, but from there, we did something different. We divided  the number of particles by 1, then divided that by Avagardo's number. The reason we did that was so that we could find the number of moles in the bag. From there, we returned to what we had done in the previous calculation, which was divide the mass of the solid by the number of moles. With that number on hand, we referenced the list of the molar masses of the possible compounds, and paired the number we found with the number closest matching a compound. So, as a result, we found bag B5 to be filled with Calcium Carbonate.

Thursday, July 2, 2015

Lab 4A: Double Replacement Reaction Lab

(Fig. 1, the well plate after the mixtures had been made)

(Fig. 2, the list of the molecular equations for each of the chemical reactions)

(Fig. 3, the list of the net ionic equations for the chemical reactions that formed a solid precipitate)

The thing that challenged me the most about this lab was making the molecular equations for each of the 10 chemical reactions. It's really important to keep tabs on the balances of each side, so constantly making sure that the number of atoms didn't change when going from a product to a reaction was a challenge.

Wednesday, July 1, 2015

Lab 3: Nomenclature Puzzle

Summary: The purpose of this lab was to establish the information about nomenclature and ions that we had learned earlier in the day by putting together a puzzle featuring names of compounds and their formulas.

(Fig. 1, a picture of the puzzle)

The biggest challenge of this lab was flipping through the lab book repeatedly and assuring that the formulas we had assumed were associated with the names of the compounds were actually supposed to paired together. My biggest contribution was, in an effort to reduce time spent on this lab, assembling pieces of the puzzle by myself, matching formulas on one side while asking if anyone had any of the other pieces I was looking for.

Tuesday, June 30, 2015

Lab 2B: Candium

The purpose of this lab was to apply the knowledge of isotopes, atomic masses, and how to find the average mass in a situation. We were given 3 different types of M&M's (which were supposed to be 3 different isotopes of new element candium), and then, step by step, applied the knowledge that we learned in the morning in a real-world environment.

My partner and I found that the average atomic mass was 1.49 amu.

1. A different group got that the average atomic mass of candium was 1.413. The reason for the difference would probably be different percentages of different isotopes. For example, the other group may have had a larger percentage of peanut M&M's than my group. Since the proportions aren't supposed to be the exact same across the board, a variance was expected.

2. If all of the groups that participated in this lab were given an entire backpack full of candium, any differences that the groups had would be smaller than they were with the sample size we were given (about a beaker full of candium). The reason for this would be because a larger sample size is more indicative of the population as a whole, so the proportions would be very close to each other.

3. If I were to place a piece of candium on a scale and weigh it, I would not expect the exact average atomic mass to come up on the scale. The reason for that is because the mass is an average of 123 pieces of candium. And since the average of a set of data isn't the same as a mode of a set of data, I wouldn't expect any piece of candium to weigh exactly the same as the average atomic mass.

4.

Lab 2A: Chromatography

(Fig. 1, my favorite paper chromatogram produced during this lab)

1. It is important that the wick and not the paper circle touches the water. The reason why this is important is because chromatography is a method of examining different components of a mixture when the components are too similar to observe without separation. So, because you have to be able to observe these different components, putting the circle straight into the water will likely result in not all of the components in the ink being visible.

2. Some of the things that affect the pattern of the colors on the paper are the brand of marker, the ink used, and the components in the ink.

3. Each ink separates into different segments because they are made with some different components. For example, with the larger ray of color on the chromatogram, the ink was black. However, there were also secondary components of the ink. So, these secondary colors are able to be seen through this method of chromatography, resulting in different colored pigment bands.

4. In all of the chromatograms that the class made, I noticed that there were a lot of light blue shadings on most of them. Since we only used black markers, the compound of the components was always the same, even though they were made by different companies. Despite the fact that we used different branded markers, it's likely that the companies used some of the same components when making their markers, so as a result, any same component in different markers will result in the same color showing up when doing chromatography.

5. Water soluble markers were used in this exercise because when they come into contact with the water, they show their components (via colors), whereas permanent markers wouldn't be able to work using water because they aren't water soluble. If one wanted to see the components that make up a permanent marker, a solvent that wasn't water would have to be used.

Monday, June 29, 2015

Lab 1B: Aluminum Foil Lab

Introduction: The purpose of this lab was to find out how thick any piece of aluminum foil would be when given a piece of aluminum foil and some solid aluminum formed in a single shape. It also served another purpose, which was how to apply the formulas we had learned, and use them to find out other values.

Procedure: To start out, my partner and I had to find out the density of aluminum so we could apply it to the piece of aluminum foil. In order to do that, we needed to find the mass and volume of the aluminum we had. In order to find the mass, we just weighed it on a scale and got a mass of 14.95 grams, and for the volume, we used the water displacement method. The water displacement method is where you fill a cylinder up to wherever you want (just not to the absolute top), drop the thing that you're trying to find the volume of into the water, and subtract the original water volume from the water volume with the object in it. Using this method, we were able to get a volume of 5.4 milliliters. And as 14.95/5.4=2.8, the density of the aluminum is 2.8 g/cm^3. Using the density, we were then able to find the thickness of the aluminum foil. To delve deeper, we developed a formula based on the results we grabbed earlier. Since we were able to find two (non-thickness) related dimensions of the aluminum foil, which were 11.11cm and 12.00cm, and the mass of the sheet of aluminum foil, which was 0.60 g, we had all the requirements in place in order to find the thickness of the sheet. Since D=M/V, we just plugged in the values to get an equation of 2.8=0.60/11.11*12.00*h. In order to get h isolated from the rest of the formula, we just multiplied both sides by h and divided both sides by 2.8 to get h=0.60/11.11*12.00*2.8.

Data: The found thickness of the sheet of aluminum foil was 0.016 mm.

Conclusion: In the end, the purpose of the lab was fulfilled, as my partner and I both found the thickness of the aluminum foil and were able to manipulate a common formula to our needs. I learned that if we do need to find some variables in one problem, but they aren't necessarily all provided, we can just find the values we need in one problem by doing another, granted that the other problem has the same values as the first. I feel that something that may have gone wrong during the lab would be the density of the aluminum, as we only tested one sample of the solid aluminum. So, as a result, I would test multiple pieces of aluminum to make sure that the density is in fact the correct density if I were to do this lab again in the future.

Lab 1A: Density Blocks

The purpose of this lab was to see if my partner and I could find the mass of a solid block with <2% error when given the density (Density=Mass/Volume) of a block and a ruler, which had measurements for every tenth of a centimeter going up to the thirtieth centimeter. 

The lab wasn't a difficult one to complete. To start out, a block of any material was given to us, as well as the block's density. Since we were supposed to find the mass of the block, and the mass of an object is equal to the density multiplied by the volume, we had to find the volume. In order to find the volume, we used the ruler provided to us in order to find the dimensions of the block. Once the dimensions were found, they were multiplied together, resulting in the volume of the block. That product and the density of the block were multiplied by each other to result in an experimental mass. Then, the block was put on a scale and the mass taken from that was compared to the experimental mass. The way it was compared was by a formula for finding how disparate the two masses were in terms of percentages, where the experimental mass is subtracted from the actual mass, and then the solution to that is divided by the actual mass, and then is multiplied by 100 in order to find the actual percentage. If the % error was greater than 2%, the teacher gives you a block of a different size, and you do the entire process over again until the % error is less than 2%.

It took three attempts before the % error was less than 2%. The first try was the hardest, with the values 39.8 grams (experimental mass) and 36.2 grams (actual mass) having a 10% difference between them. The second attempt was closer, with the masses 94.4 grams (experimental) and 96.8 (actual) only having a 2.5% difference. The third attempt was where my partner and I were able to complete the lab, with the masses 39.0 grams and 39.3 grams (experimental and actual, respectively), only having a mere 0.76% difference between them.

So, in the end, the purpose of the lab was accomplished. My partner and I were able to fulfill the requirements, as well as gain some knowledge along the way. The most important thing that I learned was that in order to really accomplish this lab successfully, you have to measure everything to a tee, as well as eye some values out to a further decimal place (i.e. On a ruler like ours, you would estimate the hundredth decimal place even though the only certain values from the ruler go out to the tenth decimal place) so you can try to be as accurate as possible. Some possible failings of this lab would be that the values, if not measured correctly enough, would lead to failure. So, as a result, when you eye the hundredth decimal place, you want to be as sure in those values as you can be so that you don't have to do the lab again. And, in the future, if I were going to do this lab again, I would want to see what a ruler with centimeters to the hundredth decimal place would do for increasing the accuracy of the experimental mass.